This guide will help you with the installation of phpmyadmin on Ubuntu 19.10. If you’re using Ubuntu 19.10 or above, you’ll notice that you cannot install phpmyadmin from apt becasue 19.10 does not come with this package. You’ll get following error
Package 'phpmyadmin' has no installation candidate
In this guide I’m going to tell you how you can install phpmyadmin within your Ubuntu 19.10 system using composer.
Make sure you’ve lamp stack setup in your system. You can follow this guide here to Install LAMP stack in your Ubuntu System
How to install Phpmyadmin in Ubuntu Linux ?
STEP 1 – In order to install phpmyadmin in ubuntu 19.10 we’ll first add the phpmyadmin ppa to our ubuntu base. In order to do that run the following command –
STEP 2 – Now, we’ll update our ubuntu libraries with the following command –
STEP 3 – Now we can install phpmyadmin with the following command
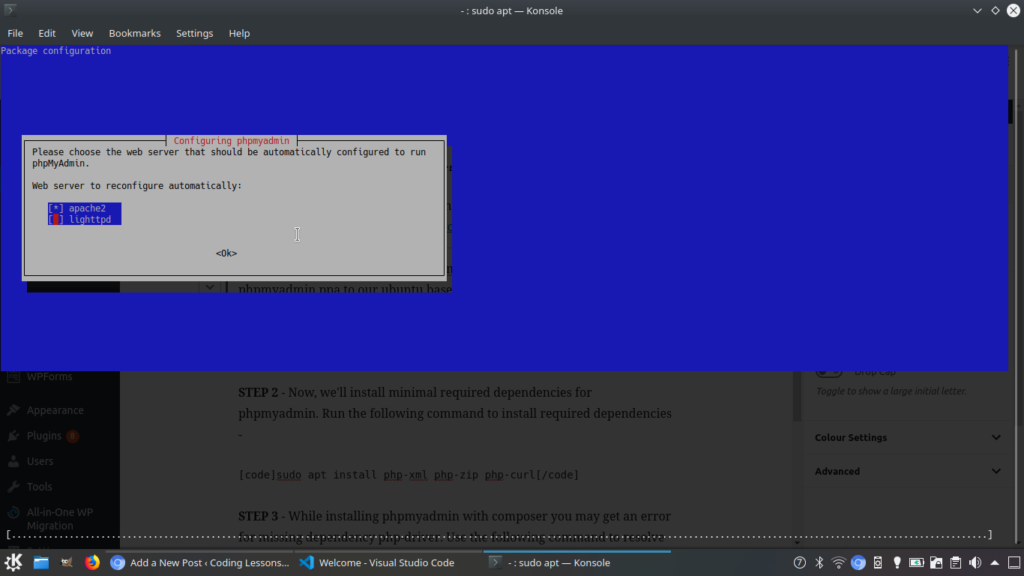
STEP 4 – To configure phpmyadmin to work with apache, in the following screen that appears choose apache2 by pressing space and use tab key to move to ok button and hit enter.
STEP 5 – Set MySQL password for your user and then confirm password.
This will install phpmyadmin on your system. Now you can access it using
http://localhost/phpmyadmin
in your browser
STEP 6 – Until now, we’ve successfully installed phpmyadmin on our system but, id your mysql version is 8.*, you’ll not be able to login with phpmyadmin and you may get following error –
The server requested authentication method unknown to the client [caching_sha2_password]
This is because the MySQL 8.0.11 is using caching_sha2_password as default authentication method which is not understandabe by phpmyadmin, so we’ll create a new user in MySQL. Login to MySQL from terminal –
Now your prompt will change to mysql > . Run the following query to create a new user for phpmyadmin –
Now you can login to phpmyadmin using above credentials i.e. –
username - xyz
password - passw0rd
But you’ll not be able create any databases with this user as we’ve not provided any privileges to this user. Then use the following query to grant privileges to the user ‘xyz’ –
Now you can access all the databases through phpmyadmin. If you’re facing any issue please comment below, I’ll try to solve your problem.
Also Read – Best download mangers for Ubuntu